I'm doing a take on cuban black beans and rice tonight!
... yes, I am also cooking chicken to serve on the side. But, that's because I am trying to cram a ridiculous amount of protein into my day.
I am also doing a vegetarian chili tomorrow, and I PROMISE I will get ingredient lists and recipes up for you! I have been a bit lax in the posting department in the last week or so, my apologies! Life happens, you know?
Stay tuned.... :)
Thursday, January 20, 2011
Tuesday, January 11, 2011
Minestrone - better late than never!
OK, I admit - this isn't a real, "traditional" minestrone. It's more like a kitchen-sink-whatever's-laying-around-plus spinach and parmesan cheese-minestrone-wannabe. But, it's good! And you can customize it to whatever you've got laying around in your cabinets.
The ingredients:
- 1/2 of a large onion, diced
- 1 cup of sliced carrot
- 1/2 lb. dried white beans, soaked for a minimum of 8 hours (but preferably overnight), picked through, and drained.
- 3 medium potatoes, peeled and diced
- 1 cup (ish) frozen green beans
- 1 can sweet corn, drained
- 1 can diced tomatoes, undrained
- 1/2 bag of fresh spinach
- olive oil
- salt, pepper, italian seasoning
- parmesan cheese
- about 6 cups of stock. You *can* use chicken, but vegetable is more traditional. (not pictured.. d'oh!)
- garlic. I think I used 3 or 4 big cloves.. but I'm a garlic freak.
Yes... I'm aware I didn't use any pasta. Yes, I'm aware that this is a travesty of huge proportions for all of you minestrone purists. HOWEVER - this makes a HUGE pot of soup, and I knew I would be eating leftovers for at least 2 or 3 days. I hate how mushy pasta gets when left in soup, and I hate how much of the liquid it absorbs while it's in the frig - so I left it out. You can certainly toss it in if that doesn't bother you, or cook it separately and just add it when you're ready to eat.

This is a really (really) easy recipe. I promise.
First, saute your onion and your carrot in a good swirl of olive oil. Normally, I'd say to add some celery in here too - and you certainly can, if celery is your THING... but I hate it. Haaaaate. It's stringy and watery and has no nutritional value, and YICK. Saute your veg until the onion is translucent, then toss in your garlic. Let it warm up for a minute or so - but don't let it brown.


OK - next, toss in everything except the spinach and the green beans. (We want to keep the green veggies GREEN, not brown and slimy. Those go in at the end.) Simmer for about 30 - 40 minutes, or until the beans and potatoes are cooked through.
 Next, pick through your spinach, and remove any tough stems. Stack it up on itself, and slice it up a little. (Note: employing girl-children to photograph the slicing may have saved my fingers from disaster. Thank you, Abbey!)

 Toss your green beans and spinach into the pot, and cook just for 5 or 6 minutes - just long enough for the beans to heat up but stay crunchy, and the spinach to wilt into the soup. Taste and make sure it is well seasoned - add salt or pepper if needed. I top mine with a ton of Parmesan cheese. MMmmmmmM!!!!


My kids ate THREE BOWLS of this stuff.. each. That is an insane amount of healthy veggie-ness for a 9 and 7 year old. I firmly believe that this process has made them both much more interested in the how's and why's of cooking, and has made them more liable to eat "good stuff" instead of junk.
I'm making my version of beef stroganoff tonight, so watch for that tomorrow!
Now - I need your opinions. As part of my "stop being a lard ass" resolution of 2011, I am trying to cook a minimum of 2 vegetarian meals per week, AND cut down on our family's sugar consumption. I am considering adding meal planning, grocery shopping tips, and vegetarian cooking to my blog. Is this something you would be interested in reading about? Please let me know, and I'll see what I can do!
Namaste, faithful readers! <3
The ingredients:
- 1/2 of a large onion, diced
- 1 cup of sliced carrot
- 1/2 lb. dried white beans, soaked for a minimum of 8 hours (but preferably overnight), picked through, and drained.
- 3 medium potatoes, peeled and diced
- 1 cup (ish) frozen green beans
- 1 can sweet corn, drained
- 1 can diced tomatoes, undrained
- 1/2 bag of fresh spinach
- olive oil
- salt, pepper, italian seasoning
- parmesan cheese
- about 6 cups of stock. You *can* use chicken, but vegetable is more traditional. (not pictured.. d'oh!)
- garlic. I think I used 3 or 4 big cloves.. but I'm a garlic freak.
Yes... I'm aware I didn't use any pasta. Yes, I'm aware that this is a travesty of huge proportions for all of you minestrone purists. HOWEVER - this makes a HUGE pot of soup, and I knew I would be eating leftovers for at least 2 or 3 days. I hate how mushy pasta gets when left in soup, and I hate how much of the liquid it absorbs while it's in the frig - so I left it out. You can certainly toss it in if that doesn't bother you, or cook it separately and just add it when you're ready to eat.

This is a really (really) easy recipe. I promise.
First, saute your onion and your carrot in a good swirl of olive oil. Normally, I'd say to add some celery in here too - and you certainly can, if celery is your THING... but I hate it. Haaaaate. It's stringy and watery and has no nutritional value, and YICK. Saute your veg until the onion is translucent, then toss in your garlic. Let it warm up for a minute or so - but don't let it brown.


OK - next, toss in everything except the spinach and the green beans. (We want to keep the green veggies GREEN, not brown and slimy. Those go in at the end.) Simmer for about 30 - 40 minutes, or until the beans and potatoes are cooked through.


My kids ate THREE BOWLS of this stuff.. each. That is an insane amount of healthy veggie-ness for a 9 and 7 year old. I firmly believe that this process has made them both much more interested in the how's and why's of cooking, and has made them more liable to eat "good stuff" instead of junk.
I'm making my version of beef stroganoff tonight, so watch for that tomorrow!
Now - I need your opinions. As part of my "stop being a lard ass" resolution of 2011, I am trying to cook a minimum of 2 vegetarian meals per week, AND cut down on our family's sugar consumption. I am considering adding meal planning, grocery shopping tips, and vegetarian cooking to my blog. Is this something you would be interested in reading about? Please let me know, and I'll see what I can do!
Namaste, faithful readers! <3
Thursday, January 6, 2011
Mmmmm Marinara!
Sorry it took me so long to write this up - it's been a hectic and tiring few days. I won't even bore you with the details of last night's dinner... let's just say that my 9 year old fed everyone.
On to yummy pasta-saucey goodness!!!
Our list of ingredients for this one include:

Dice up the onion and carrot. Put the veggies in a COLD pan with a few good swirls of olive oil. Put your pan over medium heat, and season with salt and red pepper flake. We're going to re-season this a few times as we go along, so don't overdo it. You just want enough salt on the veggies to get them to start releasing their liquid.. this is called "sweating" and is the best way to extract all the flavor.
 Now that you've got your veggies all warm and happy - start mincing up your garlic. Please... please use fresh garlic. There is absolutely no way to get the same taste out of powdered, dehydrated garlic. Yes, your hands will be stinky - but if you run them under cold water and rub them with a stainless steel spoon, most of that odor will be gone.


Toss the garlic in after your veggies have released most of their liquid. Saute for a few more minutes, but don't overdo it - if your garlic burns, it will leave a bitter taste in your sauce and that is NOT delicious. Once your garlic has gotten warm and happy, add your can of tomato paste. Let this cook down for several minutes, until it starts to develop a brown crust on the bottom of the pan. BROWN FOOD IS GOOD FOOD... and COLOR = FLAVOR. Trust me, you do not want to skip this step.


 Here is where I would normally add the red wine, and let it reduce by half before moving on. Unfortunately, I didn't have any in the house, so I threw in a cup of hot water to get all those yummy brown bits off the bottom of the pan. You need to scrape it all up as it cooks down, so that flavor will become part of your sauce. Next, I throw in my can of diced tomatoes - and this is where I do all my additional seasoning. I generally add about a teaspoon of salt, a teaspoon of sugar, and in the summer - a TON of fresh basil. (If I had to measure - and YOU CAN'T MAKE ME! - I would say about 3T of fresh basil.) Since it's out of season, I make do with dried italian seasoning - about 1.5T. You're going to let this cook for maybe 3 - 5 more minutes, to further reduce the liquid from the canned diced tomatoes.
 Lastly, I add the can of crushed tomatoes, and let the whole thing simmer for about 2 hours, stirring every 30 minutes or so. TASTE, and re-season if needed - yours may need more salt or more red pepper flake. The carrot and the sugar (or wine) will add some natural sweetness, but if you feel your sauce is too acidic you can always throw a bit more sugar in also.

 This is a really good, basic sauce recipe. I use this in everything from crockpot spaghetti and meatballs, to lasagna, to a base for bolognese. Added bonus: it's completely vegetarian, so if you have lots of veggie-head friends like I do - you can still invite them for dinner!
It's also a really good idea to save about a cup and a half of this sauce for our next recipe... Minestrone :) MMmmmmmm... more veggie-friendly food, and there is nothing that I love more than a hot pot of soup on the stove in the middle of a NY winter!
On to yummy pasta-saucey goodness!!!
Our list of ingredients for this one include:
- 1 onion (yellow, medium to large ish)
- 4 or 5 cloves of garlic
- 1 cup diced carrots
- sea salt, crushed red pepper flake, italian seasoning
- 1 can tomato paste
- 1 big can crushed tomatoes
- 1 can diced tomatoes
- 1 cup of liquid - a good dry red wine would be best, but if you don't have any in the house - a cup of water plus 1 T of sugar will work OK too.
- Olive oil

Dice up the onion and carrot. Put the veggies in a COLD pan with a few good swirls of olive oil. Put your pan over medium heat, and season with salt and red pepper flake. We're going to re-season this a few times as we go along, so don't overdo it. You just want enough salt on the veggies to get them to start releasing their liquid.. this is called "sweating" and is the best way to extract all the flavor.


Toss the garlic in after your veggies have released most of their liquid. Saute for a few more minutes, but don't overdo it - if your garlic burns, it will leave a bitter taste in your sauce and that is NOT delicious. Once your garlic has gotten warm and happy, add your can of tomato paste. Let this cook down for several minutes, until it starts to develop a brown crust on the bottom of the pan. BROWN FOOD IS GOOD FOOD... and COLOR = FLAVOR. Trust me, you do not want to skip this step.


It's also a really good idea to save about a cup and a half of this sauce for our next recipe... Minestrone :) MMmmmmmm... more veggie-friendly food, and there is nothing that I love more than a hot pot of soup on the stove in the middle of a NY winter!
Monday, January 3, 2011
Mac & Cheese, Please!
I figured I'd start off with something easy, and universally loved. My boy-child requested pigs in blankets for dinner, but I was surely not inspired to blog about wrapping smoked sausage in store-bought crescent dough... so I added a delicious side dish that is certainly blog-worthy at the very least.
First: Employ said boy-child to blanket up those pigs. He LOOKS unhappy.. but I promise you, he ate them.

Next: Put on a pot of water to boil. Make sure you salt it, aggressively. This is the ONLY CHANCE you will have to impart some flavor into that boxed macaroni... so make it count.
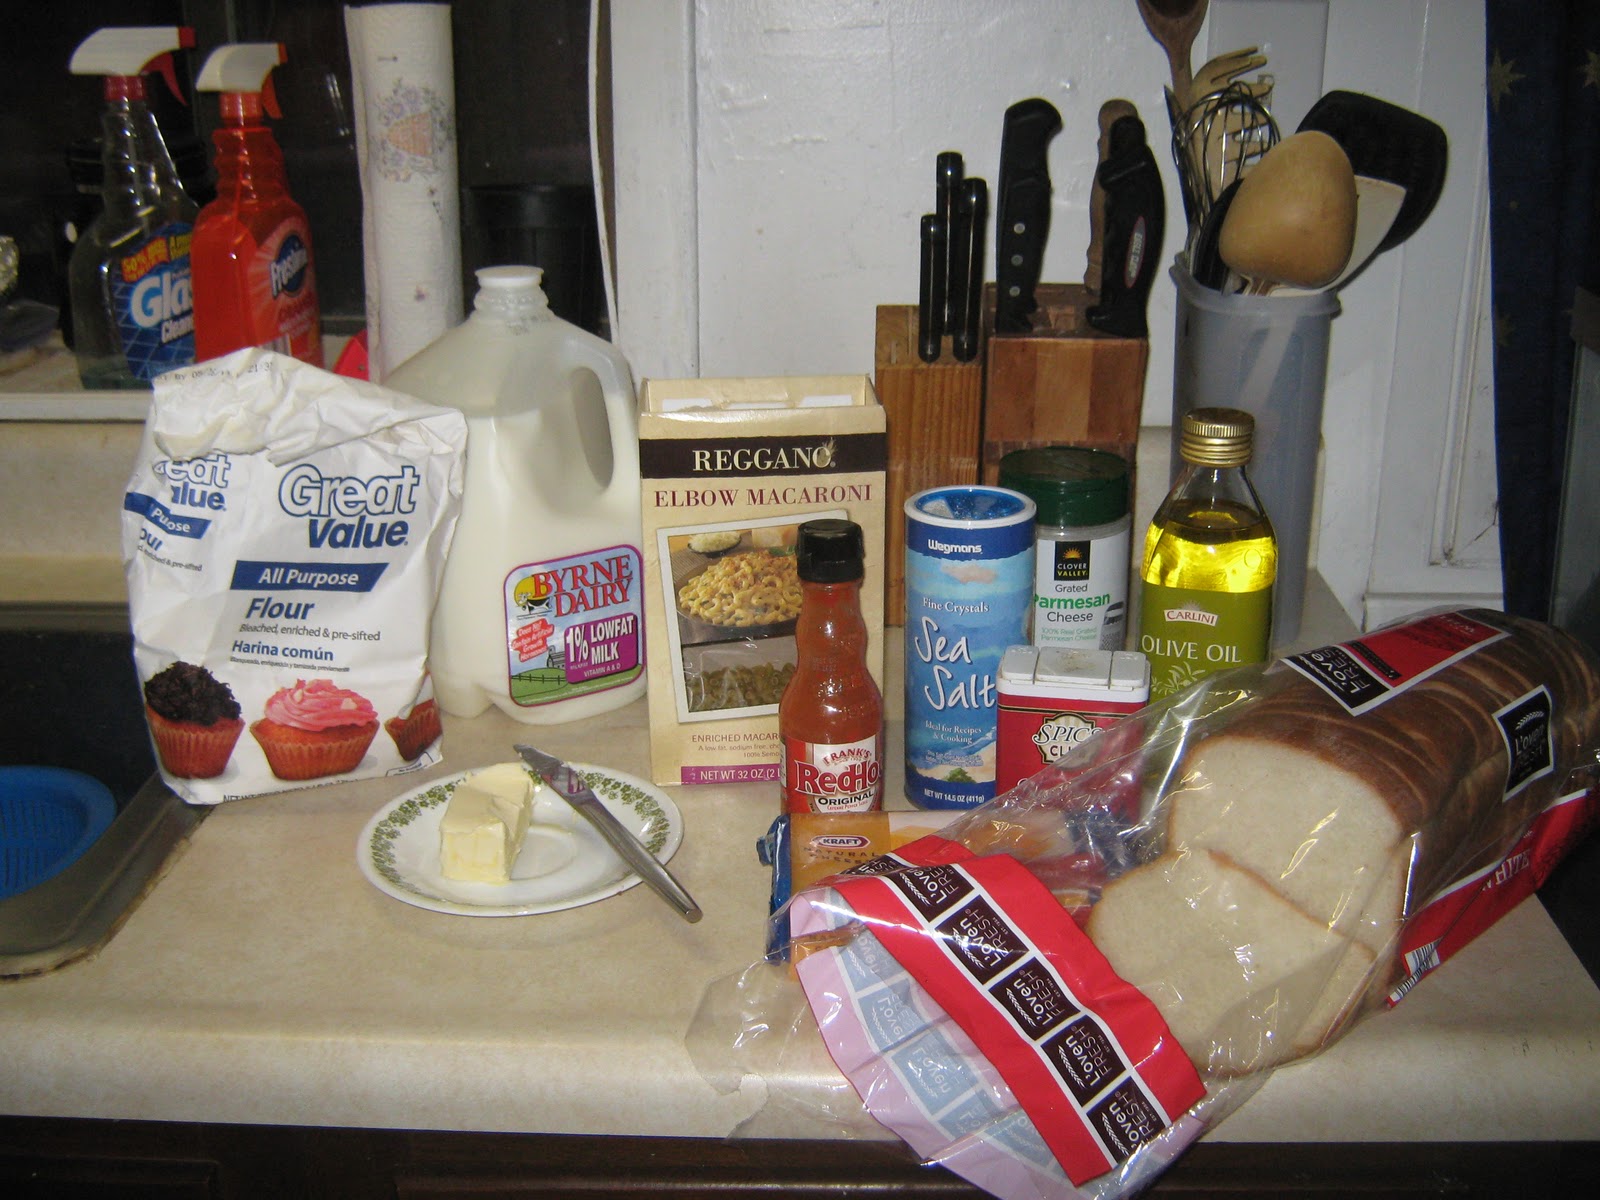
Assemble your ingredients. This recipe calls for:
- 1.5 cups of dry elbow noodles
- 2 slices of bread
- drizzle of olive oil ( I dunno.. maybe a tablespoon or so? )
- 1.5 T butter (or margerine)
- 1.5 T Flour
- 1/2 lb. cheddar cheese (I used Kraft Naturals aged wisconsin cheddar)
- 1.5 cups milk (I used 1%.. anything is really OK, except skim. Skim = ew. Trust me.)
- 1 T dijon mustard (not pictured.. whoops.)
- 1/4 cup grated parmesan cheese
- a few shakes of hot sauce, salt, and pepper

Pop the two slices of bread into the toaster. Toast them fairly dark, let them cool completely, and set aside.
Next, in a medium sauce pan, whisk together the butter and the flour, and let it cook for a few minutes to get rid of the raw flour taste.
 (At some point during the making of the sauce, the water for the noodles will come to a boil. Toss 'em in, and let them cook for 5 - 6 minutes. NO, they will not be cooked all the way - and THAT'S OK. They will finish cooking in the oven, in our cheese sauce. If you overcook them now, they will be mush in the final dish. Not delicious.)
Next, you will pour in your milk, and season it with the mustard, hot sauce, salt, and pepper. Bring this to a simmer.
 While this is coming up to a simmer, you need to dice up your cheese. I used about a 1/2" dice - the smaller the better, really, because it will melt more smoothly. Also, you need to cube up your toast into teeny tiny pieces, and toss it with a drizzle of olive oil. This will be the yummy crunchy topping!


 OK... Now that we've gotten this far - your sauce should be up to a simmer. Make sure you watch it! Dairy based sauces can scorch very easily. I don't recommend walking away from the stove, or having your heat on anything higher than medium. Here is where you will add your cheeses - very slowly. You want to add a handful, whisk until it melts, and repeat - with the Parmesan going in last. If you are like me, you can employ some more slave labor (this time in the form of the girl-child) to help with the whisking... so you can save your arm strength for EATING!


Make sure your pasta is well - drained. Any cooking liquid left will make your sauce runny, and runny = ew! DO NOT RINSE YOUR PASTA. Please. I beg you. It rinses off all the lovely starch, and your sauce will not stick to the noodles correctly. Mix your pasta with your sauce, pour into a greased casserole dish (and trust me, you want to butter that sucker good - it makes it MUCH easier to clean!), and top it with your little toast crumbles. Bake in a 400 degree oven, for 10 - 15 minutes.

 When you pull it out of the oven, it should be bubbly around the edges, and the topping should be nice and crunchy. Mmmmmmm! See? WAY BETTER than boxed mac & cheese, much healthier for you, and even your slave-laborers will approve of this cheese-tastic meal!


 If there are leftovers, you can do a few different things with them. Reheat the next day with a touch of milk to moisten and eat for breakfast. Cut the mac & cheese into wedges, bread, and then deep fry.. making amazingly evil fried mac & cheese wedges. Or... you can do what I do.. which is send the leftovers into work with the Man of the house for lunch the next day.
Tomorrow: HOME MADE MARINARA!!!! You don't want to miss this... it is one of my most-requested recipes, and a total family favorite.
Blessed Be! <3
First: Employ said boy-child to blanket up those pigs. He LOOKS unhappy.. but I promise you, he ate them.

Next: Put on a pot of water to boil. Make sure you salt it, aggressively. This is the ONLY CHANCE you will have to impart some flavor into that boxed macaroni... so make it count.
Assemble your ingredients. This recipe calls for:
- 1.5 cups of dry elbow noodles
- 2 slices of bread
- drizzle of olive oil ( I dunno.. maybe a tablespoon or so? )
- 1.5 T butter (or margerine)
- 1.5 T Flour
- 1/2 lb. cheddar cheese (I used Kraft Naturals aged wisconsin cheddar)
- 1.5 cups milk (I used 1%.. anything is really OK, except skim. Skim = ew. Trust me.)
- 1 T dijon mustard (not pictured.. whoops.)
- 1/4 cup grated parmesan cheese
- a few shakes of hot sauce, salt, and pepper
Pop the two slices of bread into the toaster. Toast them fairly dark, let them cool completely, and set aside.
Next, in a medium sauce pan, whisk together the butter and the flour, and let it cook for a few minutes to get rid of the raw flour taste.

Next, you will pour in your milk, and season it with the mustard, hot sauce, salt, and pepper. Bring this to a simmer.


Make sure your pasta is well - drained. Any cooking liquid left will make your sauce runny, and runny = ew! DO NOT RINSE YOUR PASTA. Please. I beg you. It rinses off all the lovely starch, and your sauce will not stick to the noodles correctly. Mix your pasta with your sauce, pour into a greased casserole dish (and trust me, you want to butter that sucker good - it makes it MUCH easier to clean!), and top it with your little toast crumbles. Bake in a 400 degree oven, for 10 - 15 minutes.


Tomorrow: HOME MADE MARINARA!!!! You don't want to miss this... it is one of my most-requested recipes, and a total family favorite.
Blessed Be! <3
A little intro...
The rumors are true - I have had no formal training other than hours upon hours of obsessive Food-network watching (and before food network existed, cooking shows on public access on the weekends!), and my own often overwhelming urge to feed the ones that I love, and feed them well. That said - I am an excellent cook. I thrive on new ingredients, new flavor profiles, new techniques, and reinventing them to work for my family.
So - here it is, folks - the food blog to end all food blogs. Not only will you get (loose, sometimes approximate) recipes, but step by step directions and photos from me. If I can cook it - so can you! I am not going to promise to post daily, but I will promise to let you in on all of our family favorites, and all of the new techniques and ingredients as I go.
I hope this blog will leave you confident in your own abilities, and inspired to feed the ones around you. After all - Cooking is like love. It should be entered into with abandon or not at all. Harriet Van Horne
Subscribe to:
Posts (Atom)